
Thursday, July 19, 2012

Convention 2012 Swap - Snow Swirled

This card is another one for my Above and Beyond Christmas Card swap.  I signed up for 4 different groups so I have a few of these :)  It took me a while to get to this design.  Next week I will post the thought process (and cards) that I went through to get to this card.  But once I did this one I stopped because I was In Love with it!  The snow flakes are stamped with Shimmer Paint!  Let me show you how...


First you want to set up the Whisper White so you know how much room to work with.  So emboss your cardstock with the Big Shot.  I just put the portion of the card stock I wanted embossed into the Stripe Embossing Folder.  Don't worry if you get a line from the edge of the folder as we are going to cover that up.


Wrap Cherry Cobbler Seam Binding around the card where the embossing ends and tape on the back.


Now we have our space to stamp in.  We need a palette for our Shimmer Paint.  I use a lid to an empty accessories container.  I put just a couple of drops of Platinum Shimmer Paint down.


Dip your Sponge Dauber into the paint.


Use the Sponge Dauber to dab the Shimmer Paint onto your stamp.
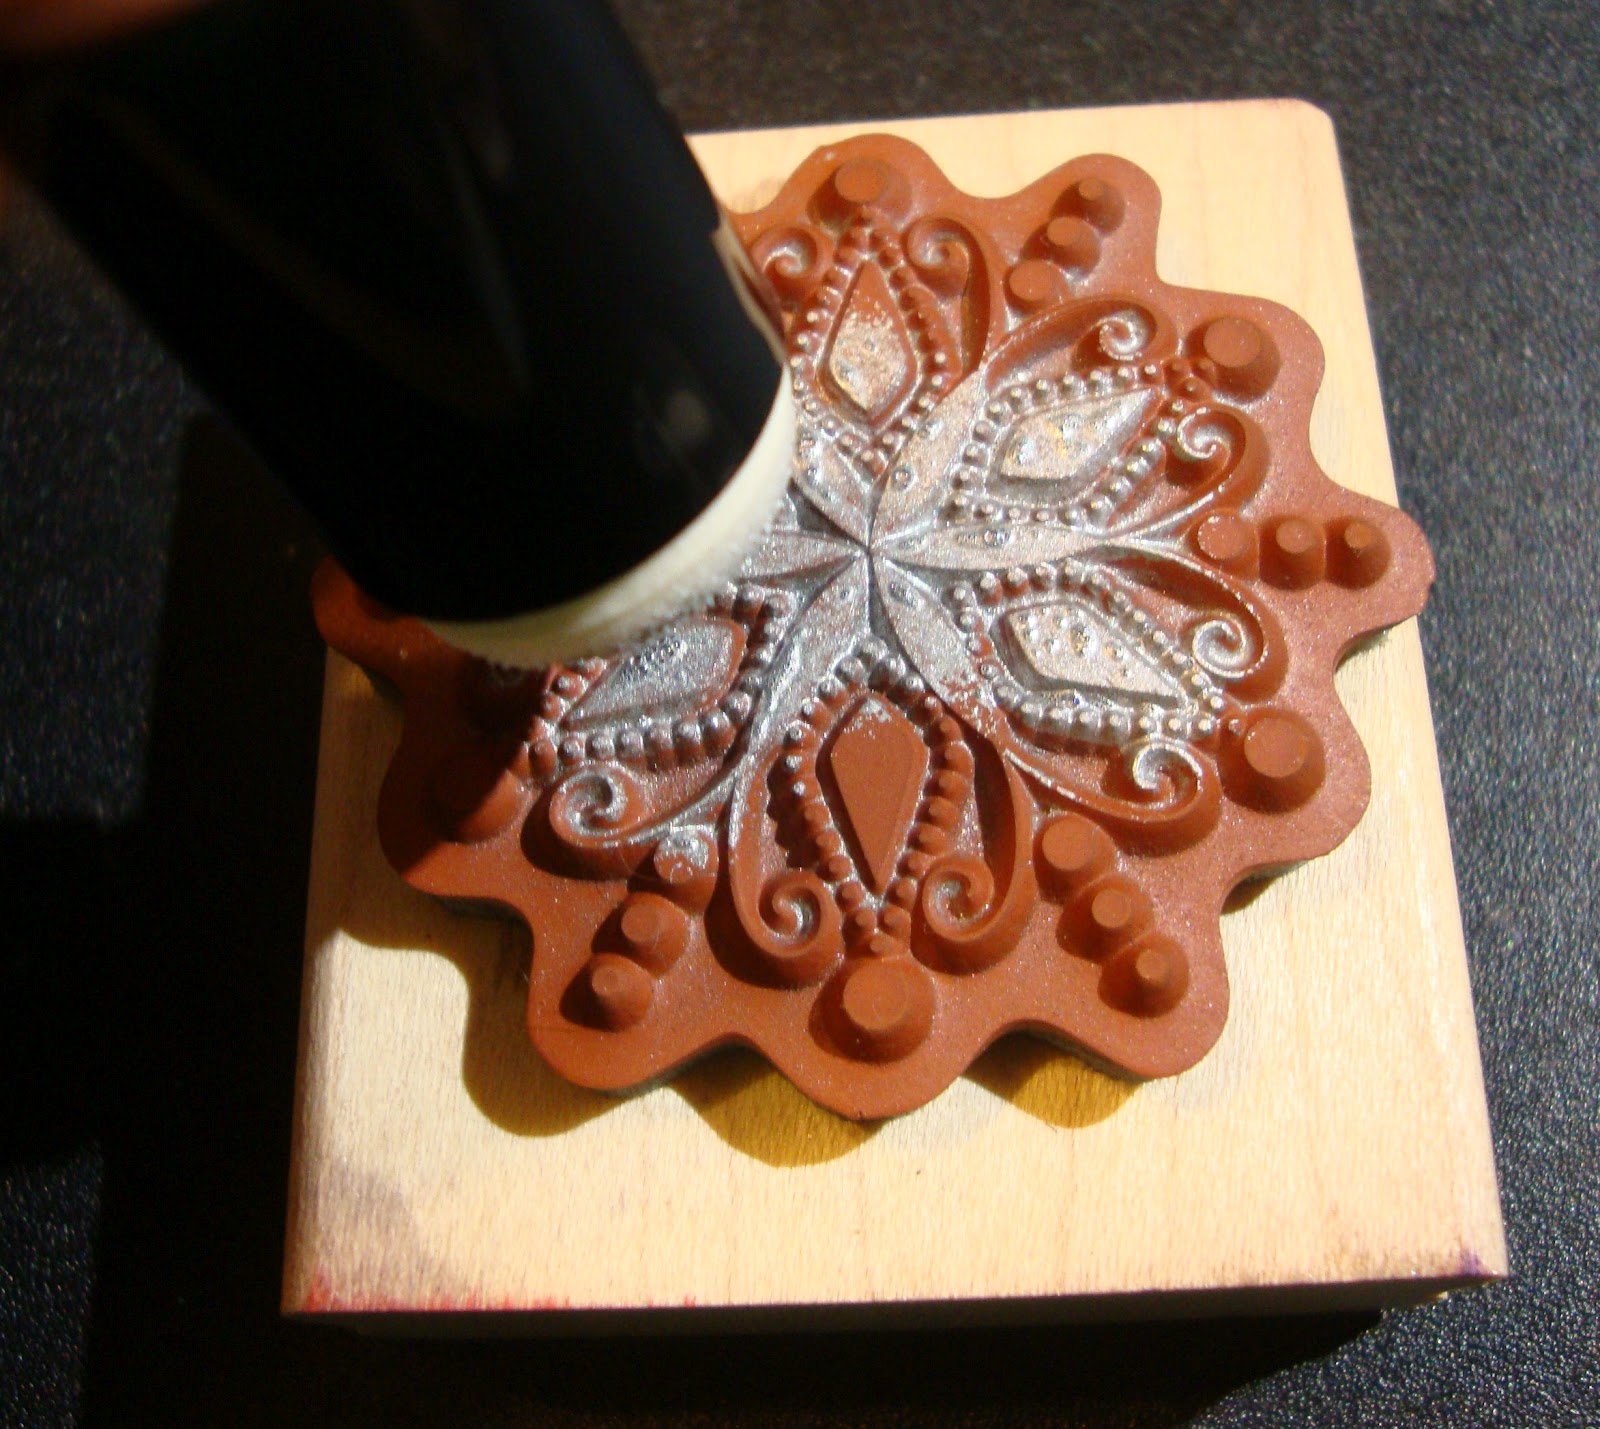

Once the stamp is covered and you even out the paint, stamp like you would normally.  The Shimmer Paint will need to sit a little while to dry so be careful not to smudge it.


Repeat the process to stamp the rest of the snowflakes.  I then punched out an ornament with the Ornament Punch and so Sliver Glitter Paper.  I adhered it to the card with Dimensionals.  I tied a bow with the 1/8" Old Olive Taffeta Ribbon and adhered it to the ornament with a Glue Dot.  Once the shimmer paint is dry, you can layer the whole piece onto your card base.

Supplies:
Stamp Set(s) - Snow Swirled
Card Stock - Cherry Cobbler, Whisper White, Sliver Glitter
Ink - none
Accessories - Cherry Cobbler Seam Binding, Stripe Embossing Folder, Big Shot, Sponge Dauber, Platinum Shimmer Paint, 1/8" Old Olive Taffeta Ribbon, Dimensionals, Glue Dots, Ornament Punch

Wednesday, July 18, 2012

Convention 2012 Swap - Lovely As A Tree Christmas

This card is for my Above and Beyond Christmas Card swap.  I am a BIG fan of Bling and therefore had a lot of fun glittering up this tree with Dazzling Diamonds!


As you can see it really Sparkles!


There is a couple more steps to Glittering that Embossing.  First stamp the tree with Gumball Green.


Then use your Embossing Buddy to remove any static from the paper.


Stamp the image again but this time with VersaMark.  If you look closely you can see that it looks wet.  Be sure to try to stay on the image with your second stamp.  To get it perfect you can use your Stamp-A-Majig.

Over a powder pal, cover the image with Heat Stick Powder.  This powder, when heated, acts like glue but is much more detailed as it only adheres to where there is VersaMark.  Shake off the excess powder.


Use your Heat Tool to start the Heat Stick Powder.  Only it it until it just looks wet, otherwise you will dry the powder out and nothing with stick to it.


You can kind of see from this picture how it looks wet from the activated Heat Stick Powder.


Over a Powder Pal, cover the image in Dazzling Diamonds Glitter.  And the shake off the access.


With your Heat Tool, set the Heat Stick Powder but heating the image just a little longer.


And Vola!  Your tree is glittery with snow!


Supplies:
Stamp Set(s) - Lovely as a Tree, Snow Swirled
Card Stock - Be of Good Cheer DS, Very Vanilla, Cherry Cobbler, Gumball Green
Ink - Gumball Green, Versamark
Accessories - Embossing Buddy, Dazzling Diamonds, Heat and Stick Powder, Heat Tool, 5/8" Cherry Cobbler Seam Binding

Tuesday, July 17, 2012

Convention 2012 Swap - Chock-Full of Cheer

This is one of my four Above and Beyond Christmas Card swaps.  Here I used the new set Chock-Full of Cheer.  I found a card similar to this on Stampin' Connection and used it as my base idea.  The Designer Paper is also new to this year's catalog.  Lets get started on the tutorial.  There are lots of layers but it is a pretty easy card.


First we emboss the White layer with the Northern Flurries Embossing Folder and Big Shot.


Take a scrap of Whisper White to use for the ornament.  Run your Embossing Buddy over it to get rid of any static.


Stamp the ornament from the Chock-Full of Cheer set in Versamark.


Over a power pal, cover the ornament in Wild Wasabi Embossing Powder.


Shake of the extra so that it is just your ornament.  (Make sure your cats don't leave hairs everywhere or you will have a hair mark in your ornament like I do *smile*).


Use your Heat Tool to heat the embossing powder to set it.


You know it is done when the entire image looks wet.  Be sure not to over heat it because you will scorch your paper and the image will dry up so much it will crack and not look as smooth and nice.  Repeat these steps for the ornament topper.


After all the embossing we want to punch our our ornament with the 1-3/4" Circle Punch.


And cut out the ornament topper with our Paper Snips.


Now we assemble our card.  First add the Wild Wasabi and Be of Good Cheer DS.


Then tie the 1/4" Wild Wasabi Grosgrain Stitched Ribbon around the Whisper White.


I adhered the Cherry Cobbler on with Dimensionals.  With the embossing and the ribbon, this helps hold it on better and not be bumpy.


After stamping the saying on, I adhere the Whisper White and then add the ornament on with Dimensionals to pop it up off the cardstock.


Lastly I adhere the entire card to the Cherry Cobbler base and add a Pearl for Bling :)


Supplies:
Stamp Set(s) - Chock-Full of Cheer
Card Stock - Cherry Cobbler, Whisper White, Wild Wasabi, Be of Good Cheer DS
Ink - Cherry Cobbler, Versa-Mark
Accessories - 1/4" Wild Wasabi Grosgrain Stitched Ribbon, Big Shot, Northern Flurry Embossing Folder, Dimensionals, Basic Pearls, Embossing Buddy, Wild Wasabi Embossing Powder, Heat Tool, 1-3/4" Circle Punch

Monday, July 16, 2012

Convention 2012 Swap - Snow Much Fun

This card is for the Above and Beyond Christmas Card Swap.  It is a 4-1/4" x 4-1/4" card but it can stand and be displayed.  When I send cards like this or the stair step card, I always get lots of complements and people love that they can display them easier.  They become part of their holiday decor.


First stamp your snowman on the Whisper White Cardstock with Stazon Black ink.  We use Stazon so that it wont smear when we color it in.


Then stamp the tag and the label and punch them out.  I then used the 1/16" Circle Punch to make a hole in the tag.


Color in the snowman using Wild Wasabi, Baja Breeze, Ridinghood Red, Pumpkin Pie, and Soft Suede Markers.  The stamp has shadow markers on it.  Use those to help make shadowing easy!


I sponged the edges with Soft Suede and a Sponge Dauber.


Using the Color Spritzer Tool, I sprayed the paper with Baja Breeze ink.  This gives the background something and it almost looks like its snowing :)


I tore a strip of fabric from Spice Cake Fabric.  I roughed up the edges a lot by pulling strings.  Then I wrapped it around the card and tied it in the front.


I then used Linen Thread to tie the label to the fabric.


Layer the entire snowman onto Ridinghood Red Cardstock. 

Now for the card base.  The base card dimensions are 4-1/4" x 8-1/2".  Using your Simply Scored, score the base at 4-1/4" as shown below.


Then using the Diagonal Plate, Score the front of the card from corner to corner as shown below.


Using Dimensionals, adhere the label to the inside of the card as shown below.


Fold the to score lines inward so that the flap catches on the label.


Here is another view of how the card folds while looking at the inside of the card.


Adhere the Snowman part to the triangle  that folds inward.  This picture is looking at the outside of the card.


Now, when you fold the card closed it looks like this...


...but if you fold it on the triangle fold it sits up!

Supplies:
Stamp Set(s) - Tiny Tags, Perfect Punches, snow Much Fun
Card Stock - Wild Wasabi, Very Vanilla, Ridinghood Red, Soft Suede
Ink - Ridinghood Red, Soft Suede, Wild Wasabi, Pumpkin Pie, Baja Breeze, Black StazOn
Accessories - Simply Scored, Diagonal Plate, Dimensionals, 1-3/4" scallop Circle Punch, Linen Thread, Tiny Tag Punch, Spice Cake Fabric, Color Spritzer Tool, 1/16" Circle Punch, Sponge Dauber

Sunday, July 15, 2012

Convention 2012 Swap - Raining Flowers

This is my card for the All Occasions swap.  It is a simple card but the stamping can be time consuming.  It is worth it though!


First, stamp the flowers by using Lucky Limeade, Wisteria Wonder, and Elegant Eggplant markers.  You have to recolor the flower each time you stamp it (the time consuming part).


Then, layer your flowers on Elegant Eggplant Cardstock.  Using the Dotted Scalloped Ribbon Border Punch, punch out Lucky Limeade Cardstock.


Adhere the punched Lucky Limeade to the bottom of the flowers.  Run some Elegant Eggplant through the Big Shot with the Beautiful Wings Embosslit to make some butterflies.  Adhere the butterflies with a Glue Dot.  Add a Rhinestone to each for some Bling!  Then stamp Happy Birthday from the Itty Bitty Banners stamp set on a piece of scrap Whisper White.  Using Bitty Banners Framelits, run it through the Big Shot.  I curled the ends up some with my finger before using Dimensionals to adhere it to the card.

Supplies:
Stamp Set(s) - Raining Flowers, Itty Bitty Banners
Card Stock - Wisteria Wonder, Elegant Eggplant, Lucky Limeade, Whisper White
Ink - Wisteria Wonder, Elegant Eggplant, Lucky Limeade
Accessories - Big Shot, Beautiful Wings Embosslit, Bitty Banner Framelits, Basic Rhinestones, Dotted Scalloped Ribbon Border Punch, Glue Dots, Dimensionals