I had been torturing my Stamp-A-Stack girls with some tough and/or time consuming cards so I thought I would do a simple but adorable card. I got this idea from Barb Mullikin.
Supplies:
Stamp Set(s) - Funky Four, Curly Cute
Card Stock - Whisper White, Not Quite Navy, Sahara Sand
Ink - Poppy Parade, Baja Breeze
Accessories - 1/2" Poppy Parade Stitched-Poly Ribbon, Scallop Trim Border Punch, Glue Dots
Saturday, April 16, 2011
Thursday, April 14, 2011
Bloomin' Away
I purchase the Build a Blossom set and coordinating punch from the mini catalog and arent they fun! I torchured my Stamp-A-Stack group by having them stamp and punch enough petals and leaves to make 4 of these cards. I thought they were going to kill me, but at the end they all loved them! I got the idea for this card from fellow demonstrator Carol Seitz.
Supplies:
Stamp Set(s) - Build a Blossom
Card Stock - Whisper White, Wild Wasabi, Early Espresso
Ink - Wild Wasabi, Marina Mist
Accessories - 5/8" Marina Mist Satin Ribbon, Ribbon Slide from Styled Vanilla Hodgepodge Hardware, Build a Blossom Punch
Supplies:
Stamp Set(s) - Build a Blossom
Card Stock - Whisper White, Wild Wasabi, Early Espresso
Ink - Wild Wasabi, Marina Mist
Accessories - 5/8" Marina Mist Satin Ribbon, Ribbon Slide from Styled Vanilla Hodgepodge Hardware, Build a Blossom Punch
Tuesday, April 12, 2011
Cards from a Friend
A friend and fellow demonstrator gave me a stack of cards she had made. She down plays her talent but her cards are aways SO BEAUTIFUL! She says she cases all her creations because she is not creative. But I just wanted to share the beauty! Thank you Diana for the gift!
Labels:
Swap
Thursday, April 7, 2011
Easter Gifts in the Works
Sorry I haven't posted when I said I would. I have been down sick since Monday. I am starting to get back up an running now. This weekend I began working on my Easter Gifts to the women in my family. I was inspired by Shelli's gift idea and a make-n-take from Regional.
First I am going to give two eggs each. One in Rose Red and another in Certainly Celery. I only finished the Rose Red egg so far but the Certainly Celery is almost done.
First I used modge-podge to adhere strips of First Edition DS Paper to a foam egg. I then used Sticky Strip and Rose Red Seam Binding around the egg and made a loop on top. I then punch a Scallop Circle out of Rose Red. I broke it down and separated it using a bone folder. I adhered the flowers on top with multipurpose glue and put a pearl in the middle (total of 6). I then used the Color Catcher and sprayed the egg with spray adhesive and dusted it with Dazzling Diamonds Glitter. ( I may have gone over board). To finish it off, I adhered a Clear bauble to the bottom. They came out great!
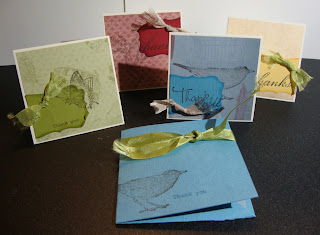
Next I made a little Thank You card pack to go with the eggs. This was a make-n-take from Regional. It is four 3x3 thank you cards and a little holder to put them all in. Very quick and easy!
The holder is just 7"x7" scored at 3-1/2" each direction. Then cut the bottom two squares on the diagonal.
I plan on putting the gift in the glittery baskets that I bought at Target for $1. Overall ave very cute gift!
Cards Supplies:
Stamp Set(s) - Nature Walk, Much Appreciated (retired)
Card Stock - Cherry Cobbler, So Saffron, Very Vanilla, Marina Mist, Old Olive, Botanical Gazette DS Paper
Ink - Early Espresso, VersaMark, Marina Mist
Accessories - Crumb Cake Seam Binding, Pear Pizzazz Seam Binding, Mini Glue Dots, Decorative Label Punch
Egg Supplies:
Card Stock - First Edition DS Paper, Rose Red
Accessories - Rose Red Seam Binding, Scallop Circle Punch, Bone Folder, Crystal Bauble, Dazzling Diamonds Glitter, Basic Pearls, Multipurpose Glue, Sticky Strip, Color Catcher, straight pins, modge podge, foam egg
Saturday, April 2, 2011
More swaps from Regional!
I told you I did a lot of swappin' Enjoy!
By: Becky Thompson
By: Carol Seitz - http://villagestamper.blogspot.com/
By: Deb Tuinier
By: Dodie Fausset
By: Gail Vogt
By: Jamie Middleton
By: Janelle Meyer
By: Kit Bauer http://www.paperkitz.blogspot.com/
By: Mari Fredericks
By: Marianne Perry
Friday, April 1, 2011
Vintage Birdcage Card
I am Very excited because today I received my order from Stampin' Up! I had order a bunch of stuff after Regional because I was so inspired! My husband is gone for the weekend and though I am going to miss him terribly, I am excited to use this quiet time to play in my stamp room! I will be highlighting my weekend projects in next weeks posts!
Here is another Make-n-Take from regional. But lets back up for a minute. When I first saw a new tool called the Color Spritzer Tool. I looked at it and didn't understand it so I dismissed it and moved on to other cool things in the catalog. Since then I have seen beautiful "sprays" of ink on cards by others. I have tried many things to recreate this look including ink on a paint brush and the smooch spritz. It wasn't until Regional that I rediscovered this Color Spritzer Tool and how to use it. DUH! So Simple! Other Demonstrators at my table had to think I was just NUTS for not knowing about this tool! It is now my new best friend!
It may be hard to see from the picture of the card but there is Cherry Cobbler and Not Quite Navy Sprayed on to the background and the birdcage of the card. It is easier to see the spray on the envelope.
For those of you that are like me, here is a quick tutorial:
Insert Marker into Color Spritzer Tool
Grip the little pump and squeeze
hold a little ways from the paper to create a nice spray of ink. Simple and awesome, everyone needs one of these! Needless to say, I will be doing research on any other item in the catalog I do not completely understand.
Supplies:
Stamp Set(s) - Nature Walk Set
Card Stock - Cherry Cobbler, Naturals Ivory, Not Quite Navy, Botanical Gazette DS
Ink - Early Espresso pad and marker, Cherry Cobbler marker, Not Quite Navy marker
Accessories - Crumb Cake 1/2" Seam Binding, Pearls, Stampin' Dimensionals, Mini Glue Dots, Sticky Strip, Color Spritzer Tool, Itty Bitty Shapes Punch Pack
Subscribe to:
Comments (Atom)


