Showing posts with label Accessories. Show all posts

Tuesday, July 12, 2011

All Occasions Card Swap - Birthday

Prior to convention, I signed up for several organized swaps.  This card is for an All Occasions Swap which just means that your card could be for any occasion.
As I have been playing with the new In Colors, Wisteria Wonder has quickly become my favorite color.  Paired up with Elegant Eggplant it is to die for!  This card also features a favorite technique of mine, Emboss Resist with Embossing Folders and the Big Shot.


First you have to create your resist image.  I used Stampin' Up's Original Die, 3" Circle.  I used this die to cut a circle in chip board.


Once you have your image that you want resisted cut out, lay the Embossing Folder over the chip board to position where you want it.  Draw marks around the corners so you remember where it goes then remove it and put down removable two sided tape.


Position the Embossing Folder back to where you want it using the marks you drew.


Insert your paper inside the Embossing Folder.


The Big Shot should be set up so that you are on Tab 2.


Then place the chip board and Embossing Folder and finally a Cutting Board.  (So you will only use one Cutting Board).


When taping down an embossed image, it is best to put tape on the regular cardstock and then adhere the embossed image.  This will keep the pressure from flattening the embossing.


Supplies:
Stamp Set(s) - Aviary, Teeny Tiny Wishes
Card Stock - Elegant Eggplant, Wisteria Wonder, Whisper White
Ink - Wisteria Wonder, Early Espresso
Accessories - Rhinestones, 3" Circle Die, Big Shot, 2-3/8" Scallop Circle Punch, 1-3/4" Circle Punch, Word Window Punch, Lattice Lace Embossing Folder

Wednesday, June 1, 2011

Sparkle and Bloom

This is the last quick and easy card I have for you using the Touch of Kindness set.  This is a little different as I have also used the Blossom Bouquet Triple Layer Punch which is Fantastic!
The Blossom Bouquet Triple Layer Punch gives you tons of combinations with three punch images from one punch!  Just set the button to the punch you want and punch!


Here are the three punches that result.  Two of the punches you get a flower and a ring!


I have jazzed it up with some Rhinestone bling!

Supplies:
Stamp Set(s) - Touch of Kindness
Card Stock - Daffodil Delight, Marina Mist, Pumpkin Pie, Real Red, Whisper White
Ink - Basic Black Marker, Stazon Black, Old Olive
Accessories - Blender Pen, Blossom Bouquet Triple Layer Punch, 1/16" Circle Punch, Fire Rhinestones, Ice Rhinestones, Dimensionals

Thursday, April 14, 2011

Bloomin' Away

I purchase the Build a Blossom set and coordinating punch from the mini catalog and arent they fun!  I torchured my Stamp-A-Stack group by having them stamp and punch enough petals and leaves to make 4 of these cards.  I thought they were going to kill me, but at the end they all loved them!  I got the idea for this card from fellow demonstrator Carol Seitz.


Supplies:
Stamp Set(s) - Build a Blossom
Card Stock - Whisper White, Wild Wasabi, Early Espresso
Ink - Wild Wasabi, Marina Mist
Accessories - 5/8" Marina Mist Satin Ribbon, Ribbon Slide from Styled Vanilla Hodgepodge Hardware, Build a Blossom Punch

Friday, April 1, 2011

Vintage Birdcage Card

I am Very excited because today I received my order from Stampin' Up!  I had order a bunch of stuff after Regional because I was so inspired!  My husband is gone for the weekend and though I am going to miss him terribly, I am excited to use this quiet time to play in my stamp room!  I will be highlighting my weekend projects in next weeks posts!

Here is another Make-n-Take from regional.  But lets back up for a minute.  When I first saw a new tool called the Color Spritzer Tool.  I looked at it and didn't understand it so I dismissed it and moved on to other cool things in the catalog.  Since then I have seen beautiful "sprays" of ink on cards by others.  I have tried many things to recreate this look including ink on a paint brush and the smooch spritz.  It wasn't until Regional that I rediscovered this Color Spritzer Tool and how to use it.  DUH!  So Simple!  Other Demonstrators at my table had to think I was just NUTS for not knowing about this tool!  It is now my new best friend!


It may be hard to see from the picture of the card but there is Cherry Cobbler and Not Quite Navy Sprayed on to the background and the birdcage of the card.  It is easier to see the spray on the envelope.

For those of you that are like me, here is a quick tutorial:

Insert Marker into Color Spritzer Tool


Grip the little pump and squeeze


hold a little ways from the paper to create a nice spray of ink.  Simple and awesome, everyone needs one of these! Needless to say, I will be doing research on any other item in the catalog I do not completely understand.

Supplies:
Stamp Set(s) - Nature Walk Set
Card Stock - Cherry Cobbler, Naturals Ivory, Not Quite Navy, Botanical Gazette DS
Ink - Early Espresso pad and marker, Cherry Cobbler marker, Not Quite Navy marker
Accessories - Crumb Cake 1/2" Seam Binding, Pearls, Stampin' Dimensionals, Mini Glue Dots, Sticky Strip, Color Spritzer Tool, Itty Bitty Shapes Punch Pack

Wednesday, March 30, 2011

Thank You Make N' Take

We had 5 Make n' Takes at the Regional.  I am going to show you the ones with a fun technique!  This is a 3"x3" card with a stamped envelope to match.  The cool little technique is with the Rosette.  You may already know this; however, I didnt so I'm sharing :)  The Rosettes come only in Vanilla but you can make them any color you want by coloring them with a Stampin' Write Marker and then using an Aqua Painter to spread the ink and soak it in to the flower.  Add more ink from the marker for darker colors and less for lighter.


Supplies:
Stamp Set(s) - Nature Walk, Thank You Kindly
Card Stock - Early Espresso, Naturals Ivory
Ink - Early Espresso, Cherry Cobbler, Old Olive
Accessories - Vanilla Rosettes, Mini Glue Dots, Aqua Painter

Tuesday, February 8, 2011

Defining Valentines Day

When I first laid eyes on the Occasions Mini Catalog, I knew I was buying the Valentine Defined set.  I just loved it!  And living in Florida made me desperately want the flamingos!  Its a Florida Requirement.  I dove in when I got it and made this card.  I got the idea from the Stampin Up Demonstrator community from a demonstrator named Michele Reynolds.  I am a huge fan!

It is a fairly simple card but with lots of layers.  The hardest part is the bow.  I actually just taped a hunk of ribbon around the cardstock and then once the card was all assembled, I tied a little bow and attached it with a glue dot.  The small heart at the bottom is punched out of the Red Glimmer Paper.  I am a HUGE fan as I love to add dimension, in this case textural, but hate to actually glitter as it is so messy!


Supplies:
Stamp Set(s) - Valentine Defined
Card Stock - Real Red, Basic Black, Whisper White, Red Glimmer
Ink - Basic Black, Real Red
Accessories - Small Heart Punch, Pinking Hearts Border Punch, 1/8" Black Taffeta Ribbon

Friday, February 4, 2011

Year of the Rabbit

Happy Chinese New Year! (one day late)  Here is the card that I created for the new year.  It was meant to post yesterday but I failed to schedule my posts.  I was in a training this week and therefore was lining my posts to go without me but I forgot to actually set that up.  FAIL

I bought the Kimono Kids stamp set as I fell in love with it.  I of course saw the new year as a perfect time to use it.  The background stamp is actually not Stampin Up but an Asian characters background that I found in some store.  Everything else is Stampin Up.  For the color on the card I used my ink pads and blender pen.  I love the painted look it gives.  The buttons are adhered with craft glue.


Supplies:
Stamp Set(s) - Kimono Kids
Card Stock - Basic Black, Real Red, Whisper White
Ink - Real Red, Wild Wasabi, Regal Rose, Marina Mist, Staz-on Black
Accessories - Designer Buttons Neutrals and Regals, Blender Pen, craft glue

Sunday, January 30, 2011

Elegant Christmas Thank You

Here is another card I created back in November.  I used this card as my Thank Yous to send after Christmas.  I think the elegance in this card is just stunning yet it is very simple in design.  This basic design can be used for so many occasions, just change up the image and words!


Supplies:
Stamp Set(s) - Snow Swirled, Because I Care
Card Stock - Basic Black, Whisper White
Ink - Basic Black
Accessories - 1/8" Black Taffeta Ribbon, Basic Rhinestones

Friday, January 28, 2011

January Birthday Card

HELLO!  I have missed you!  Have you missed me?  Christmas time is always a crazy time for me but this year we moved into a new house as well!  Sadly my Stampin' world drifted off the to do list for a little while but I am back up and running!  My new stamp room is up and functional and amazing.  I promise pictures to come but I want to accomplish a few more things in it before I show it off.

For my first card back, I wanted to show you the card I used for my January birthdays.  I actually made these in November in anticipation of being out of commission for a while (I am just as shocked as you of my forethought).  I did get this idea from somewhere but it has been so long I don't remember where (so sorry).


Here is a shot to see the silver a little better, love the shimmer to it!


Supplies:
Stamp Set(s) - Serene Snowflakes, Birthday Greetings (retired)
Card Stock - Crumb Cake, Night of Navy, Whisper White
Ink - Night of Navy, Encore Silver
Accessories - Scallop Border Punch, Snowflake Punch, Basic Pearls

Thursday, November 11, 2010

Have a Cute Christmas

I had a very sad disaster occur at my last Stamp-A-Stack.  You may remember this post with the wonderful letterpress plate.  Well, we were going to make this card and as I was demonstrating how to use the plate I made a fatal error!  I forgot to flip my multipurpose platform from tab 2 to tab 1.  By the time I had realized my mistake the beginning of the letterpress and gone through and because it is plastic, it flattened the design :(  So please learn from my mistake and make sure your platform is on TAB 1 or it will ruin the plate!

With some quick thinking on my feet and some help from some of my girls we whipped up this adorable card using the same materials we already had available.  I think the ladies had fun decorating their Christmas trees.  Needless to say, the card was still a big hit!


As the card base is dark I had extra Very Vanilla for the inside of the card.  We put a cute package to go "under" the Christmas trees.


Supplies:
Stamp Set(s) - Have a Cute Christmas
Card Stock - Garden Green, Very Vanilla
Ink - Garden Green, Real Red ink and marker
Accessories - 1/4" Real Red Grosgrain Ribbon, Basic Rhinestones

Tuesday, October 26, 2010

Dasher with Bling

I have been doing a lot of card surfing (blogs and on the Stampin' Connection) while sitting in the hospital with my dad.  I have found so many wonderful idea, there are so many talented people out there.  I rarely have original ideas and I try my hardest to give credit to every idea I use.  Sadly this next card, I can not locate the original idea.  If anyone has seen this before, let me know where so that I can give credit where credit is due.

I really enjoyed this card.  I love bling and this year it is so much easier to add it with our Basic Rhinestones and Basic Pearls.  I'm addicted.  The original card used glitter but I wasn't in the mood to mess with it so the Rhinestones worked perfectly.


I even added one on his nose!  Too fun!  The ribbon is just a small piece taped to the back and then the whole Dasher piece is adhered with Dimensionals (helps hide the bulk of the ribbon).


My little word window was punched out with the Curly Label Punch.  I then stamped my saying on Whisper White and punched it out too.  Just add some glue to the back then adhere it to the inside by going through the window, that way you know it lines up.


Tada!  A saying on the inside too!


Supplies:
Stamp Set(s) - Dasher, Serene Snowflakes, Occasional Quotes
Card Stock - Old Olive, Whisper White, Real Red
Ink - Old Olive, Real Red, Chocolate Chip
Accessories - Curly Label Punch, Ticket Corner Punch, 5/8" Real Red Satin Ribbon, Basic Rhinestones, Dimensionals

Tuesday, October 5, 2010

My November Birthday Card

Okay, I know I am way ahead posting my November birthday cards but I wanted everything done so I could fully move on to Christmas.  I also need to be ahead of schedule as my husband and I are house hunting and we may end up moving during the holiday season and I am NOT buying my cards!!!

I took this picture on an Old Olive background as the card disappeared on white.  The card is pretty straightforward except the pumpkin.  To do this I used a technique called Thumping.  The idea of thumping is you coat the stamp with on color (I lighter color) then use a marker to add (thump) spots of a darker color over top.  On the stamp, color the entire pumpkin with Pumpkin Pie.  Then color the stem Old Olive.  Finally, take Cajun Craze and color spots of the pumpkin (right over the Pumpkin Pie).  Huff on the stamp and stamp it onto your paper.  Multiple colors in one easy step!  It is a great way to add shading right to the image you want to stamp.


Supplies:
Stamp Set(s) - Paisley Prints, wish from a retired set
Card Stock - Whisper White, Pumpkin Pie, Cajun Craze, Old Olive
Ink - Pumpkin Pie, Cajun Craze, Old Olive Markers
Accessories - Square Scallop Punch, Paper Snips, Big Shot, Square Lattice Embossing Template, Dimensionals, Jewelry Tag Punch,1/16" Circle Punch, Linen Thread, Brights Designer Buttons

Thursday, August 26, 2010

Watercolor Flowers

Sorry I haven't posted!  I am working at Florida Gulf Coast University and fall semester started up this week, things have been busy and I have been exhausted afterwards!

I created these cards off of some cards that Andrea Walford made.  I had a lot of fun with the Watercolor Trio set.  Hurry to get your set from the Summer Mini!


The first card I actually messed up and made backwards!  I cut my card stock (bashful blue) in half long ways.  The Early Espresso is a 1/4 sheet.  I stamped the card left to right with the space on the right, Mistake!  Be sure to stamp right to left and leave your gap on the left.  When you fold the card, slide the Early Espresso in and tear so to expose your stamping.  Tie the ribbon around the torn edge and then tape down so to hide your ribbon.  Easy and beautiful!


This card is very easy to put together.  I layered with Sahara Sand, Bashful Blue, and Early Espresso.  Stamped my images in Craft White.  Stamped on Whisper White and punched it out with the Wide Oval Punch and attached with Demensionals.  I added a Rhinestone to take it up a notch.  Fun!


Using the same colors to layer as the previous card, I designed this card.  I used the Square Lattice Embossing Folder on the Bashful Blue.  I wrapped some Linen Thread around and added a couple Rhinestones for embellishment.


Supplies:
Stamp Set(s) - Watercolor Trio
Card Stock - Early Espresso, Bashful Blue, Sahara Sand, Whisper White
Ink - Craft Whisper White, Early Espresso
Accessories - 5/8" Satin Early Espresso, Linen Thread, Rhinestones, Square Lattice Embossing

Thursday, August 12, 2010

Because I Care

I was having a rough creativity day so I went to my Google Reader for inspiration.  That is where I found this card.  Just beautiful.  Thank you Linda for sharing!  I loved it so much I didn't change a thing.  Don't miss the Paper Piercing embellishment in the top left corner!


It uses one of my favorite techniques, painting with a blender pen. Just squish the ink pad before opening it to get ink on the lid. Then flip the lid open and use it as your pallet and paint way!


Have I mentioned before how much I am a fan of the new Bling!


Supplies:
Stamp Set(s) - Because I Care
Card Stock - Night of Navy; Crumb Cake; Marina Mist; Whisper White
Ink - Black StazOn; Marina Mist
Accessories - Mat Pack; Paper Piercer; Blender Pen; 2" x 1-3/8" Oval Punch; 1-3/4" x 7/8" Oval Punch; Basic Rhinestones, Dimensionals

Monday, August 2, 2010

Last Christmas Card and My Helpers

Before I get to my last Christmas in July card I wanted to show you a couple of my helpers.  I have a total of four helpers but on this day only two of them were "all paws on deck".

This is Bagheera.  She loves to help with the paper.


This is Meeko, she is good at taking care of the scraps and picking out the stamp sets.  Very good my girls are :)


Now for the last Christmas in July card.  I actually did some more work on this card that I posted earlier.  I just didn't like it, but could not put my finger on why.  I decided that it was the white background.  So I changed the background to Marina Mist and used an Embossing Folder for texture.  I then did the snowflake on Whisper White.  I also added more pearls, Love the Bling!  What do you think, better or worse?


Supplies:
Stamp Set(s) - Serene Snowflakes
Card Stock - Whisper White, Marina Mist
Ink - Marina Mist
Accessories - Big Shot, Top Note Die, Polka-Dot Embossing Folder, Basic Pearls

Saturday, July 31, 2010

Dimensional Snowflakes

Sorry I didn't post all week, I just sort of spaced out and forgot.  I have a few more cards to show you from my Christmas in July fun.  This card I saw on Split Coast Stampers and thought it looked really cool so I thought I would give it a try.  I stamped the Serene Snowflake twice, once on the card and once to cut out.  The one that I cut out I only cut out the diamonds and circle in the middle and then put a Rhinestone Brad through to center.  I attached it to the card with Dimensionals.


The rest of the card seems boring.  I will add a saying under the ribbon but still seems plain.  I will have to work on that.  I definitely like the look of this but wouldn't do too many because of the hand cutting.

Supplies:
Stamp Set(s) - Serene Snowflakes
Card Stock - Whisper White, Bashful Blue, Night of Navy
Ink - Marina Mist
Accessories - 1/8" Night of Navy Grosgrain Ribbon, Clear Rhinestone Brads, Dimensionals

Vintage Snowflakes

I am not a Vintage style type of person but when it comes to Christmas all rules change.  I have shown you so fun, light Christmas cards so far so today is softer, vintage Christmas. 

This card is so quick and easy!  First I stamped snowflakes all over the card in Soft Suede and Marina Mist (so LOVING Marina Mist!).  I then took a sponge and Soft Suede and brushed the edges and lightly sponged over the card.  Ta Da!  Vintage!  Of course I like dimension so I added some ribbon and a Rhinestone too :)


Here is a detail picture.  See the sponging!


Supplies:
Stamp Set(s) - Serene Snowflakes
Card Stock - Marina Mist, Whisper White
Ink - Marina Mist, Soft Suede
Accessories - 5/8" Marina Mist Grosgrain Ribbon, Basic Rhinestones, Sponges, Dimensionals

Saturday, July 24, 2010

Snowflake Merry Christmas

Snow in the Summer!  How fun!  First, I apologize the pictures are dark.  Second, I would love your opinion!  I am not sure if I like this card or not.  I really like the Top Note Die Cut and what is stamped on it, I just think the white background-even with it stamped-doesn't work.  I tried some embossed backgrounds but it felt like too much.  It might be that I am just so used to putting ribbon on everything, I don't know what to think when it is absent.  Thoughts?


I definitely had fun with the large snowflake.  Details are great!  I am thinking of adding the smallest pearls to each of the points of the diamonds instead of the white dots.  I love Bling!!!


Supplies:
Stamp Set(s) - Serene Snowflakes
Card Stock - Whisper White, Bashful Blue
Ink - Marina Mist, Bashful Blue
Accessories - White Gel Pen, Big Shot, Top Note Die, Basic Pearls

Sunday, July 18, 2010

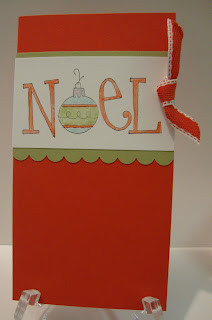
Noel Big On Christmas

My Christmas in July has finally begun.  This first card I got from pg 32 from the Idea Book & Catalog.  I love using the catalog for ideas! 

This is a simple card.  The base dimensions are 6-1/2" x 3-1/2".  The Noel is "painted" in with ink and a blender pen.  One of my favorite techniques, it looks like you have painted!

Supplies:
Stamp Set(s) - Big On Christmas
Card Stock - Poppy Parade, Pear Pizzaz, Whisper White
Ink - Basic Black, Poppy Parade, Pear Pizzaz, Baja Breeze
Accessories - 1/2" Poppy Parade Stitched-Poly Ribbon, Scallop Edge Border, Blender Pen

Thursday, June 3, 2010

Animal Cracker Bunny

I am honoring retiring stamp sets this week.  Saw this on Split Coast Stampers and thought it would be perfect.  Split Coast Stampers is a great place to get ideas when you are stuck.  Many wonderful artists share their work there. 

The card is 4" x 4" and the white is 3" x 3".  I selected two flowers and a rhinestone brad from the Pretties Kit.  I brushed Pixie Pink on the edge of the white then decided to put it on Pixie Pink, next time I wont brush the pink.  Otherwise it came out cute. 


Supplies:
Stamp Set(s) - Animal Crackers (retiring)
Card Stock - Whisper White, Pixie Pink (retiring)
Ink - Staz-On Black, Pixie Pink (retiring), Only Orange (retiring)
Accessories - Pretties Kit (retiring), Dimensionals, Paper-Piercing Tool, Mat Pack