Showing posts with label Easter. Show all posts

Tuesday, April 2, 2013

Easter

My Easter card this year!  It came out super cute!  Got the idea from a fellow stamper.  Thank you Monika Davis.


Supplies:
Stamp Set(s) - Everybunny
Card Stock - Crumb Cake, Tangerine Tango, Whisper White, Floral District DS
Ink - StazOn Black, Rose Red, Daffodil Delight, Tango Tangerine, Baja Breeze, Lucky Limeade, Soft Suede
Accessories - Big Shot, Floral Frames Framelits, 2-1/2" Circle Punch, Blender Pen, Dimensionals, Lucky Limeade Ruffled Ribbon

Monday, March 25, 2013

Swap With My Downline

I participated in a swap with my downline.  Check out the AWESOME cards I got! 
Note:  there are materials that are retired or are not Stampin' Up!


Marge McGuire


Jill Perkins


Kathy Johnson


Carol Johnson


Carol Johnson


Kathy Johnson


Marge McGuire

Friday, April 6, 2012

Easter Chick

My last Easter project this year, an ADORABLE chick!  All the So Saffron paper is sponged with More Mustard on the edges to give it some accent color.  The staple that holds the bag shut and the head topper in place is hidden under the nose.  The wings are held onto the bag with Glue Dots.  I just LOVE him!  It helps that his belly is full of yummy chocolate :)  And shopping for the candy I discovered that they make Reese Cup mini eggs!  The BEST!!!  You will notice there are none of those in that bag, hee hee.


Supplies:
Card Stock - So Saffron, Pumpkin Pie, Whisper White, Basic Black
Ink - More Mustard
Accessories - 1-1/4" Square Punch, Scallop Circle Punch, 1/2" Circle Punch, Build A Blossom Punch, Sponge Daubers, Big Shot, Top Note Die, Glue Dots, Small Cellophane Bag

Thursday, April 5, 2012

Everybunny

Here is one of my Easter cards.  I just love its fun, spring look.  The flowers are adhered with Glue Dots and then Pearls are added for some beautiful bling!  The coloring is done with ink pads and a blender pen.  This card is done with Naturals Ivory but only because I ran out of my Naturals White from my class.  It looks better with Naturals White. 


Supplies:
Stamp Set(s) - Everybunny
Card Stock - Naturals White, So Saffron, Wisteria Wonder, Pink Pirouette
Ink - Stazon Black, Wisteria Wonder, So Saffron, Pink Pirouette
Accessories - Mini Glue Dots, Itty Bitty Shapes Punch Pack, Basic Pearls, Big Shot, Framelits Label Collection, Blender Pen

Wednesday, April 4, 2012

Candy Carrot Fun

Here is another great treat for the Easter basket. I think this little Candy Carrot is my favorite and very simple. 

And here is how:  After getting two Petal Cones cut out with the die, use Sticky Strip to adhere them together.  In the top, punch two holes for the Satin Ribbon to go through.  Fill with candy and then seal with a bow.  Tie the Taffeta Ribbon in a knot around the bow.  Sponge the edges of the label with Pumpkin Pie ink.  Stamp Happy Easter on it.  Roll the edges with your fingers and adhere to the carrot with glue dots.  Accent the ends with Basic Pearls.


Supplies:
Stamp Set(s) - Teeny Tiny Wishes
Card Stock - Pumpkin Pie
Ink - Basic Black, Pumpkin Pie
Accessories - Big Shot, Petal Cone Die, 5/8" Old Olive Satin Ribbon, 1/8" Old Olive Taffeta Ribbon, Basic Pearls, Sponge Dauber, Crop-a-dile, Sticky Strip, Glue Dots

Friday, March 30, 2012

Easter Candy Fun

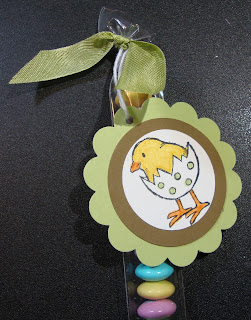
Easter is just around the corner!  Have you started to think about those Easter baskets?  Here is a cute idea. This is Very simple and great for those last minute gifts.  The label is created and colored and then attached to the top of a 1" x 8" Cello bag full of Easter colored M&Ms.


Supplies:
Stamp Set(s) - Everybunny
Card Stock - Whisper White, Soft Suede, Certainly Celery
Ink - StazOn Black; Certainly Celery, Pumpkin Pie, Daffodil Delight markers
Accessories - 1-3/8" Circle Punch, Certainly Celery Seam Binding, 1-3/4" Circle Punch, 2-3/8" Scallop Circle Punch, 1"x8" Cellophane Bag, 1/16" Circle Punch, White Baker's Twine

Thursday, April 7, 2011

Easter Gifts in the Works

Sorry I haven't posted when I said I would.  I have been down sick since Monday.  I am starting to get back up an running now.  This weekend I began working on my Easter Gifts to the women in my family.  I was inspired by Shelli's gift idea and a make-n-take from Regional.

First I am going to give two eggs each.  One in Rose Red and another in Certainly Celery.  I only finished the Rose Red egg so far but the Certainly Celery is almost done. 

First I used modge-podge to adhere strips of First Edition DS Paper to a foam egg.  I then used Sticky Strip and Rose Red Seam Binding around the egg and made a loop on top.  I then punch a Scallop Circle out of Rose Red.  I broke it down and separated it using a bone folder.  I adhered the flowers on top with multipurpose glue and put a pearl in the middle (total of 6).  I then used the Color Catcher and sprayed the egg with spray adhesive and dusted it with Dazzling Diamonds Glitter.  ( I may have gone over board).  To finish it off, I adhered a Clear bauble to the bottom.  They came out great!

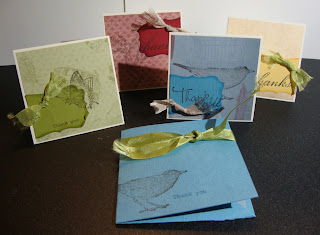
Next I made a little Thank You card pack to go with the eggs.  This was a make-n-take from Regional.  It is four 3x3 thank you cards and a little holder to put them all in.  Very quick and easy!


 The holder is just 7"x7" scored at 3-1/2" each direction.  Then cut the bottom two squares on the diagonal.


I plan on putting the gift in the glittery baskets that I bought at Target for $1.  Overall ave very cute gift!
Cards Supplies:
Stamp Set(s) - Nature Walk, Much Appreciated (retired)
Card Stock - Cherry Cobbler, So Saffron, Very Vanilla, Marina Mist, Old Olive, Botanical Gazette DS Paper
Ink - Early Espresso, VersaMark, Marina Mist
Accessories - Crumb Cake Seam Binding, Pear Pizzazz Seam Binding, Mini Glue Dots, Decorative Label Punch

Egg Supplies:
Card Stock - First Edition DS Paper, Rose Red
Accessories - Rose Red Seam Binding, Scallop Circle Punch, Bone Folder, Crystal Bauble, Dazzling Diamonds Glitter, Basic Pearls, Multipurpose Glue, Sticky Strip, Color Catcher, straight pins, modge podge, foam egg

Thursday, March 25, 2010

Simple Happy Easter Card

Here is a simple Happy Easter card.  I am just in love with this card!  I got the layout from this card.  What is even better about this card is you can put just about any saying you want on it and use it for any occasion.  This would be a great card to make up a bunch without the saying and then add it when you know what you need the card for.  I love having these types of cards around for "emergencies". 


Supplies:
Stamp Set(s) - Well Scripted
Card Stock - Certainly Celery, Whisper White
Ink - Certainly Celery
Accessories - 5/8" Certainly Celery Satin Ribbon, Scallop Edge Punch, Tea Party DS Paper, Perfect Polka Dots Textured Plate, Big Shot

Saturday, March 20, 2010

Demonstrator Meeting

What a GREAT time we had at this month's Demonstrator Meeting!  Only five of us ended up being able to make it this month but we still had such a great time!  In my last two posts I had mentioned this meeting.

Our Card Challenge was to make a card using our least favorite colors.  I showed you mine.  Here are some others.


This was done by Judie. She is not a fan of Brocade Blue. I thought she did a great job! I was impressed she had Designer Series Paper to match!


This was done by Marcy.  She was also showing off her mad skills at paper flower making.  One of these days I need to sit down and try one.  Maybe I will get her to give me a tutorial. :)

Besides my Shoebox swap we made one other provide by Marcy.  Isnt this ADORABLE!!!  This little bunny envelope is made from the Petal Card Bigz Die.  The bunny is made from the following punches:  Ornament, Large Oval, Small Oval, 1/2" Circle, and 1/4" Circle (retired).  I am just in love with him and already trying to think of other ways to use him!


Here are the girls, I took pictures without warning so I am sure they will be mad at me for posting them.  Sorry Ladies!


Lisa Reber and Barbara Pelak

Marcy Walsh


Judie McCandless

Thank you Ladies for all you do!

Saturday, March 6, 2010

Such a Cute Egg

The best part about Easter is that I get to use cute chick stamp sets!  Admit it, this little chick is cute!  I got this idea from Dana Arczynski.


Supplies:
Stamp Set(s) - A Good, Egg
Card Stock - Certainly Celery, Mellow Moss, Whisper White, retired DS paper
Ink - Basic Black
Accessories - Stampin' Pastels, 1/4" Whisper White Grosgrain Ribbon, Scallop Trim Border Punch

Wednesday, March 3, 2010

A Good Egg Easter Card

I CASEd this card from the Demonstrator Community Website.  Of course, now that I go back to find it again to credit the creator I cant find it.  I fell in love with it as soon as I saw it.  This card ended up being a little more difficult than I anticipated.  For the window I punched the 1-3/4" Circle punch.  Each layer had to be punched separately.  I started with the top layer then glued it and lined up and punched the second layer, etc....  This would have been much easier had I had the Circle #2 Die for the Big Shot.  Once I had the window punched out I had to figure out how to line up the chick on the inside.  I drew a little pencil circle so I could line him up.  I couldn't stamp him straight through because he is a little bigger than the circle.  I used Ruby Red Ink and a Blender Pen to 'paint' in his egg.  I used Stampin' Pastels to color in the chick giving him a soft fluffy look.

  
You can see from the inside shot the little chick and the Happy Easter message.  Of course, after all this work, I dropped the Happy Easter Stamp and made an extra mark...just my luck :)


Supplies:
Stamp Set(s) - A Good Egg, Well Scripted
Card Stock - Whisper White, Pretty in Pink, Retired DS Paper
Ink - Ruby Red, Basic Black
Accessories - 5/8" Pretty In Pink Satin Ribbon, 1-3/4" Circle Punch, Blender Pen, Stampin' Pastels